

Which Line Segments Do You Draw To Find The Center Of A Circle Circumscribed About A Triangle?
Square Construction
In this activeness you are going to employ the following tools. Brand certain yous know how to use each tool before you begin with the actual construction of the square:
| | Segment |
| | Perpendicular Line |
| | Line |
| | Circle With Middle Through Betoken |
| | Intersect |
| | Polygon |
| | Show / Hide Object |
| | Move |
Preparations
- Open a new GeoGebra window.
- Switch to Perspectives – Geometry.
- Change the labeling setting to New Points Just (carte du jour Options – Labeling).
Structure Steps
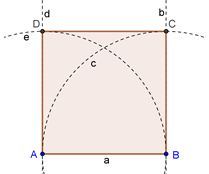
- Draw segment a = AB between points A and B
- Construct perpendicular line b to segment AB through point B
- Construct circle c with heart B through signal A
- Intersect circle c with perpendicular line b to get intersection point C
- Construct perpendicular line d to segment AB through betoken A
- Construct circumvolve e with middle A through bespeak B
- Intersect perpendicular line d with circle due east to get intersection point D
- Create polygon ABCD (Don't forget to shut the polygon past clicking on betoken A after selecting indicate D.)
- Hide circles and perpendicular lines
- Perform the drag test to check if your construction is right
Can you come up with a unlike way of constructing a square?
Regular Hexagon Structure
In this activity you are going to employ the post-obit tools. Make sure you know how to utilise each tool before you begin with the actual structure of the hexagon:
| | Circle With Middle Through Point |
| | Intersect |
| | Polygon |
| | Angle |
| | Show / Hide Object |
| | Motility |
Preparations
- Open up a new GeoGebra window.
- Switch to Perspectives – Geometry.
- Alter the labeling setting to All New Objects (menu Options – Labeling).
Construction Steps
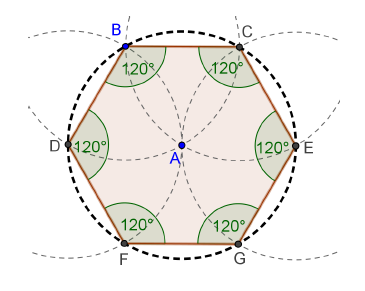
- Draw a circumvolve with center A through point B
- Construct another circumvolve with heart B through indicate A
- Intersect the ii circles in order to get the vertices C and D.
- Construct a new circumvolve with heart C through point A.
- Intersect the new circle with the showtime one in club to get vertex E.
- Construct a new circle with center D through point A.
- Intersect the new circle with the first one in order to get vertex F.
- Construct a new circle with center Eastward through bespeak A.
- Intersect the new circle with the first one in order to become vertex G.
- Draw hexagon FGECBD.
- Create the angles of the hexagon.
- Perform the elevate test to check if your construction is correct.
![]() Hint: Which radius do the circles have and why?
Hint: Which radius do the circles have and why?
Circumscribed Circumvolve of a Triangle Construction
In this activity you are going to use the following tools. Make certain you know how to apply each tool before you brainstorm with the actual structure of the circumscribed circle:
Preparations
- Open a new GeoGebra window.
- Switch to Perspectives – Geometry.
- Change the labeling setting to New Points Only (menu Options – Labeling).
Construction Steps
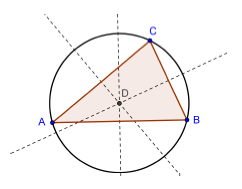
- Create an arbitrary triangle ABC
- Construct the line bisector for each side of the triangle. The tool Line bisector can be applied to an existing segment.
- Create intersection point D of two of the line bisectors. The tool Intersect ii objects can't be applied to the intersection of three lines. Either select ii of the three line bisectors successively, or click on the intersection point and select 1 line at a fourth dimension from the actualization list of objects in this position.
- Construct a circumvolve with centre D through one of the vertices of triangle ABC
- Perform the drag test to cheque if your construction is correct.
Back to schoolhouse...
Modify your construction to answer the post-obit questions:
- Tin can the circumcenter of a triangle lie outside the triangle? If yes, for which types of triangles is this truthful?
- Try to find an explanation for using line bisectors in order to create the circumcenter of a triangle.
Visualize the Theorem of Thales
Back to schoolhouse...
Earlier you lot begin this structure, check out the dynamic worksheet chosen Theorem_Thales.html in gild to see how students could rediscover what the Greek philosopher and mathematician Thales found out near 2600 years ago. In this activity y'all are going to utilize the following tools. Make certain you know how to employ each tool before you begin with the actual construction:
| | Segment |
| | Semicircle through 2 Points |
| | Point |
| | Polygon |
| | Bending |
| | Move |
Preparations
- Open up a new GeoGebra window.
- Switch to Perspectives – Geometry.
- Change the labeling setting to New Points Merely (card Options - Labeling).
Construction Steps
- Depict segment AB
- Construct a semicircle through points A and B. The order of clicking points A and B determines the direction of the semicircle.
- Create a new point C on the semicircle. Cheque if point C really lies on the arc by dragging it with the mouse.
- Create triangle ABC
- Create the interior angles of triangle ABC
Effort to come up with a graphical proof for this theorem.
![]() Hint: Create midpoint O of segment AB and display the radius OC as a segment.
Hint: Create midpoint O of segment AB and display the radius OC as a segment.
Amalgam Tangents to a Circumvolve
Discussion
- Which tools did you lot use in order to recreate the structure?
- Were there any new tools involved in the suggested structure steps? If yeah, how did you observe out how to operate the new tool?
- Did y'all notice anything most the toolbar displayed in the correct applet?
- Practice you lot think your students could work with such a dynamic worksheet and notice out about construction steps on their own?
What if my Mouse and Touchpad wouldn't piece of work?
Imagine your mouse and / or touchpad finish working while you are preparing GeoGebra files for tomorrow'southward lesson. How can you lot cease the structure file?
GeoGebra offers algebraic input and commands in addition to the geometry tools. Every tool has a matching command and therefore could exist applied without fifty-fifty using the mouse.
Notation: GeoGebra offers more commands than geometry tools. Therefore, not every command has a respective geometry tool!
Task
Check out the listing of commands adjacent to the Input Bar and wait for commands whose corresponding tools were already introduced in this workshop. As you saw in the last activity, the construction of tangents to a circle can be washed by using geometric construction tools only. You will at present recreate this construction by only using keyboard input.
Preparations
- Open up a new GeoGebra window.
- Evidence the Algebra View and Input Bar, also as coordinate axes (View Carte du jour)
Construction Steps
| 1 | A = (0, 0) | Point A |
| 2 | (three, 0) | Point B |
| three | c = Circle[A, B] | Circle with center A through point B |
Note: GeoGebra distinguishes between gratis and dependent objects. While complimentary objects can exist directly modified either using the mouse or the keyboard, dependent objects adjust to changes of their parent objects. Thereby, it is irrelevant in which style (mouse or keyboard) an object was initially created!
Task 1
Actuate Motion mode and double click an object in the Algebra View in guild to alter its algebraic representation using the keyboard. Hit the Enter cardinal once you lot are done.
Chore 2
You lot can use the arrow keys in club to movement free objects in a more controlled mode. Activate Move fashion and select the object (e.one thousand. a complimentary point) in either window. Printing the upward / downwards or left / right arrow keys in social club to motion the object into the desired direction.
| 4 | C = (5, iv) | Indicate C |
| 5 | southward = Segment[A, C] | Segment Ac |
| half-dozen | D = Midpoint[due south] | Midpoint D of segment AC |
| 7 | d = Circle[D, C] | Circle with center D through point C |
| 8 | Intersect[c, d] | Intersection points E and F of the two circles |
| 9 | Line[C, Eastward] | Tangent through points C and Due east |
| x | Line[C, F] | Tangent through points C and F |
Checking and Enhancing the Construction
- Perform the drag-test in order to check if the construction is correct.
- Change properties of objects in order to improve the structure's advent (eastward.g. colors, line thickness, auxiliary objects dashed,…)
- Relieve the structure.
Discussion
- Did any problems or difficulties occur during the construction steps?
- Which version of the structure (mouse or keyboard) practice you prefer and why?
- Why should nosotros use keyboard input if we could likewise practise it using tools?
 Hint: There are commands bachelor that have no equivalent geometric tool.
- Does it thing in which way an object was created? Tin can it be inverse in the Algebra View (using the keyboard) also equally in the Graphics View (using the mouse)?
Exploring Parameters of a Quadratic Polynomial
Back to school
In this action y'all will explore the impact of parameters on a quadratic polynomial. You volition experience how GeoGebra could be integrated into a "traditional" teaching surround and used for active, student-centered learning.
Preparations
- Open up a new GeoGebra window.
- Switch to Perspectives – Algebra & Graphics.
Construction Steps
- Open a new GeoGebra window
- Blazon in f(x) = x^2 and hit the Enter key. Which shape does the role graph have? Write downwards your answer on paper.
- In
 Move mode, highlight the polynomial in the algebra view and use the ↑ up and ↓ down arrow keys.
 - How does this bear on the graph of the polynomial? Write down your observations.
- How does this impact the equation of the polynomial? Write downwardly your observations.
- Again, in Motion manner, highlight the function in the Algebra View and utilise the ← left and → correct arrow keys.
- How does this impact the graph of the polynomial? Write down your observations.
- How does this touch on the equation of the polynomial? Write downwardly your observations.
- In Movement fashion, double click the equation of the polynomial. Utilize the keyboard to modify the equation to f(x) = 3 x^2. Use an asterisk * or infinite in order to enter a multiplication.
- Describe how the function graph changes.
- Repeat changing the equation by typing in unlike values for the parameter (due east.g. 0.five, -2, -0.eight, iii). Write down your observations.
Discussion
- Did whatever problems or difficulties concerning the utilize of GeoGebra occur?
- How can a setting like this (GeoGebra in combination with instructions on paper) be integrated into a "traditional" teaching environment?
- Do you recall information technology is possible to give such an activity equally a homework problem to your students?
- In which way could the dynamic exploration of parameters of a polynomial mayhap bear on your students' learning?
- Exercise you lot take ideas for other mathematical topics that could be taught in like learning environment (newspaper worksheets in combination with computers)?
Using Sliders to Modify Parameters
Let's endeavour a more dynamic manner of exploring the impact of a parameter on a polynomial f(10) = a x^two by using a slider to modify the parameter value.
Preparations
- Open a new GeoGebra window
- Switch to Perspectives – Algebra & Graphics
Construction Steps
| 1 | a = 1 | Create the variable a = 1 |
| 2 | Brandish the variable a every bit a slider in the Graphics View. | |
| three | f(x) = a * x^two | Enter the quadratic polynomial f |
| 4 | | Create a slider b using the Slider Tool |
| v | f(x) = a * x^2 + b | Enter the polynomial f |
Tips and Tricks
1. Name a new object by typing proper noun = into the input bar in front of its algebraic representation.
Example: P = (3, two) creates betoken P.
2. Multiplication needs to be entered using an asterisk or space between the factors.
Instance: a*x or a x
iii. GeoGebra is case sensitive! Thus, upper and lower case letters must not be mixed up.
- Points are e'er named with upper case letters
Case: A = (1, 2)
- Vectors are named with lower instance messages
Case: v = (1, iii)
- Segments, lines, circles, functions… are always named with lower case letters.
Example: circle c: (10 – two)^two + (y – 1)^two = sixteen
- The variable ten inside a function and the variables x and y in the equation of a conic department always need to be lower instance.
Case: f(10) = 3*x + 2
four. If y'all want to use an object within an algebraic expression or control you need to create the object prior to using its name in the input bar.
- y = thousand x + b creates a line whose parameters are already existing values m and b (east.yard. numbers / sliders).
- Line[A, B] creates a line through existing points A and B.
five. Ostend an expression you entered into the input bar past pressing the Enter key.
6. Open up the help window for using the input bar and commands by selecting Help from the Aid Carte du jour (or shortcut F1).
7. Fault messages: Ever read the messages – they could possibly help to fix the trouble!
8. Commands can be typed in or selected from the list next to the Input Bar.
![]() Hint: If you don't know which parameters are required within the brackets of a sure control, type in the full command name and press key F1 to open the GeoGebra Wiki.
Hint: If you don't know which parameters are required within the brackets of a sure control, type in the full command name and press key F1 to open the GeoGebra Wiki.
9. Automatic completion of commands: After typing in the starting time 2 letters of a command into the Input Bar, GeoGebra tries to complete the command.
- If GeoGebra suggests the desired command, hit the Enter key in order to place the cursor within the brackets.
- If the suggested command is not the ane y'all wanted to enter, just keep typing until the suggestion matches.
Challenge of the Day: Parameters of Polynomials
Use the file created in the concluding activity in order to piece of work on the following tasks:
- Change the parameter value a by moving the point on the slider with the mouse. How does this influence the graph of the polynomial? What happens to the graph when the parameter value is
- greater than 1,
- between 0 and ane, or
- negative?
Write downwards your observations.
- Change the parameter value b. How does this influence the graph of the polynomial?
- Create a slider for a new parameter c. Enter the quadratic polynomial f(x) = a * ten^ii + b 10 + c. Change the parameter value c and find out how this influences the graph of the polynomial.

Source: https://wiki.geogebra.org/en/Tutorial:Geometric_Constructions_&_Use_of_Commands
Posted by: harrisonsiquene.blogspot.com
0 Response to "Which Line Segments Do You Draw To Find The Center Of A Circle Circumscribed About A Triangle?"
Post a Comment